Chinese Rice Wine

Homemade Chinese Rice Wine

Today, we will be going over how to make some basic Chinese or Shaoxing Rice Wine. Before we delve into how I’ve made it, I think it’s important to learn the culture and history of the foods

A Brief History of Rice Wine

Li Bai sipping wine at JianHu Lake

Evidence for alcoholic beverages date back 3700 years ago during the Shang dynasty. Archaelogist have found jars of ancient rice wine which date back thousands of years. At first, rice wine was a celebratory beverage only enjoyed by the super wealthy or during times of fantastic harvest. Rice wine required that there be an excess harvest as it was not a favorable use of rice when it could be consumed as food. Therefore, in early times it symbolized a propsering community. However, as rice wine slowly grew in popularity, production methods and government intervention allowed for it to be produced cheaply. Soon, every restaurant, tavern, and inn had jar upon jar of rice wine. In almost every single ancient Chinese show you can see martial artists drinking heavily in pubs.

Rice wine production is something that even today is not 100% mechanized. Depsite all the advances in technology every single vat of rice wine produced must first be run by a professional. They check up on the rice wine everyday and listen to the bubbles, inhale the scent of the fermentation, and visualize the yeast producing carbon dioxide. Once they have deemed the vat of rice wine ready to go, then machines take over the filtering and processing of the wine. I’ve linked here a really great video on the production of rice wine: Secrets Behind an Age-old Rice Wine Recipe😋

Production

Fermenting Rice Wine

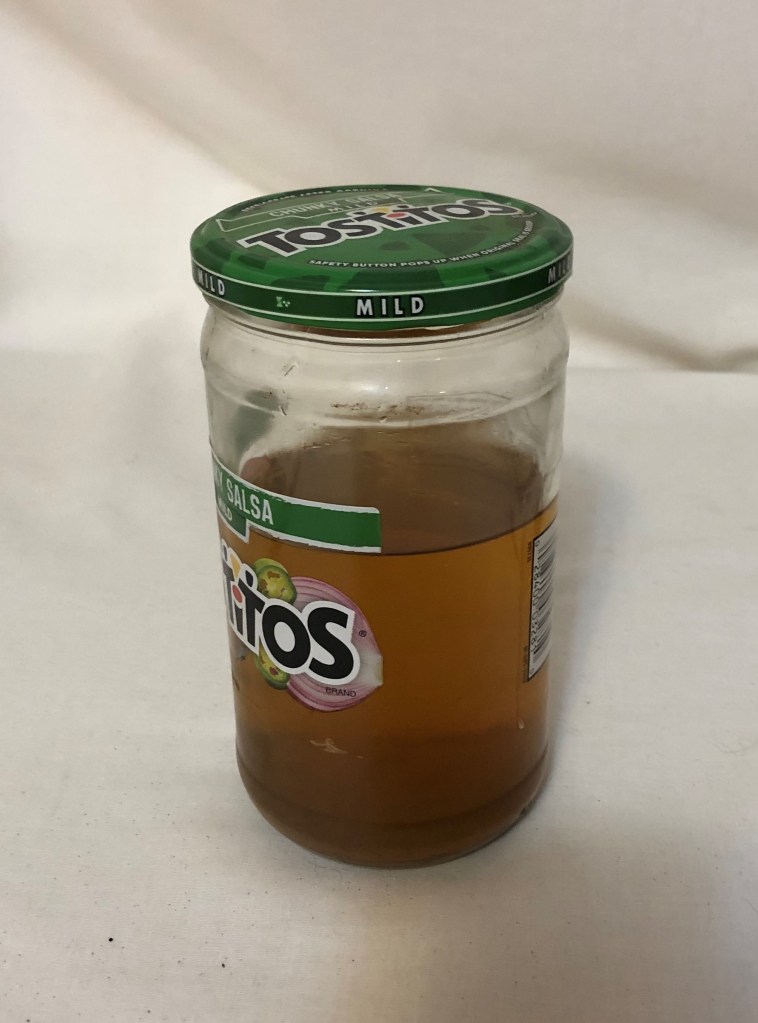
I know you guys are probably all wondering why the heck I’ve got a salsa jar on this blog about rice wine. But I assure you, this is indeed fermenting rice wine. While the process of making rice wine appears relatively simple, there a few tricks here and there to make it taste all that much better.

Step 1 – Boiling The Ingredients

Combine the following ingredients and boil them over the stove for approximately 45min.

  • 1 cup glutinous rice flour (if you don’t have glutinous rice flour you can either take rice and grind it in a blender or find it at your local Chinese grocery store)
  • 1/2 cup sugar (completely dependent on how sweet you want it)
  • 1tbsp yeast
  • 5 cups tap water (best not to use spring or bottled water)

LET’S SPICE THINGS UP

Here, you can add some flavoring or something special. While making it I personally added some homegrown strawberries. I was making this rice wine for my mom and she really loves fruity stuff so I threw some of that in. But here’s a short list of other possible ideas.

  • Mint
  • Any fruit or fruit juice
  • Black sesame
  • Chocolate (This one is not for the faint of heart. Some may love it, and most will hate it)

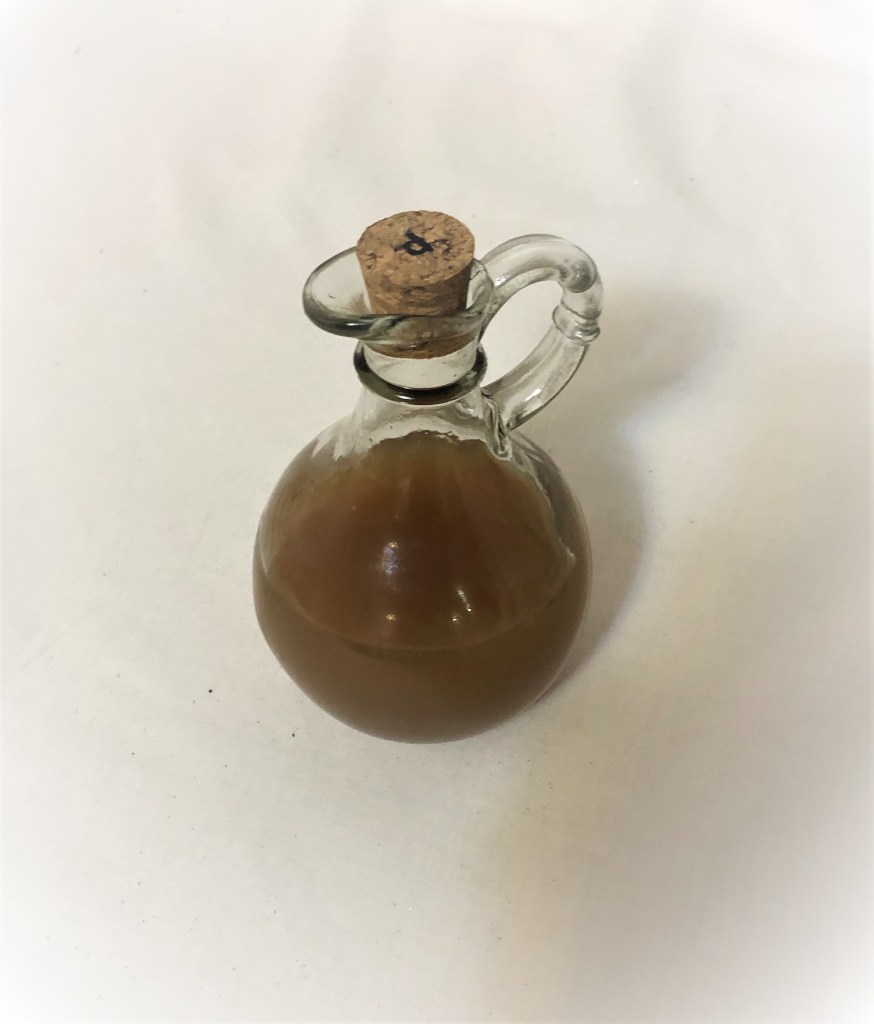
Step 2 – Filtering and Bottling

This part is relatively simple. Take your boiled mixture and remove all the solids from the solution. Then put these in glass jars with the seal a little bit loose. It is very important that the seal is slightly loose. Otherwise, the pressure inside the container may be too great for a plastic or paper bottle causing it to go KABOOM.

Step 3 – The Waiting Game

It takes some patience, but the longer you wait the better. Check in on your wine every two or three days and give it a quick stir. If you see any particles floating to the bottom try and filter them out. I recommend waiting at least 2 months but the wine should be ready after only 2 weeks.

Step 4 – ITADAKIMASU

CHOW TIME

I’ve hoped you enjoyed this process. I truly believe rice wine is an amazing drink that can bring joy to any household. If you tried making this yourself please leave a comment and let me know how it went!

Dumplings

My family and I just recently made dumplings for New Year’s and I wanted to share with you guys the recipe I used and a little bit about the history of dumplings. To make dumplings there are 6 steps:

  1. Making the dough
  2. Mixing the Filling
  3. Kneading the dough into small circles about 4-6in wide
  4. Making the dumplings
  5. Cooking the dumplings
  6. My favorite step… EATING THE DUMPLINGS


Ingredients:

  • Water
  • Flour
  • Salt
  • Pepper
  • Cabbage
  • Pork
  • Corn Starch
  • Soy Sauce
  • Oyster Sauce
  • Vegetable Oil

Before I begin I would like to say that the 1st and 3rd steps are completely optional. You can go to your local Chinese or Korean grocery store like Great Wall or H-Mart and I am sure you can find dumpling skins there. However, making the dough yourself is very rewarding and in my opinion, makes the dumplings taste better.

Step 1 – The Dough

To make the dough simply mix together water and flour. As a general rule of thumb 2 cups of flour for every cup of water. However, it is important that you also go by feel. Some people like stiffer dough (more flour) and some like softer dough (more water). In general, you want something stronger than oobleck but softer than silly putty.

Step 2 – The Filling


The filling is where the flavor of the dumpling resides. If your filling is too salty or not salty enough you will definitely taste it in your dumplings. To make your filling you’re going to use…
-Pork
-Cabbage
-Soy Sauce
-Oyster Sauce
-Water
-Vegetable Oil
When making the filling mix together all of these in a bowl and spend 10-15min thoroughly mixing the meat. Special Hint 1: The more you mix the filling the better it will taste. Mixing the meat helps combine the fat making the meat much tastier. Special Hint 2: Soak the cabbage in salt with a bit of water and squeeze it. You don’t want the cabbage sitting in water but you do want it damp and slightly salty. The salt helps suck out the moisture in the cabbage and wringing it dry will get rid of all that moisture. If you don’t do this your dumplings may have watery instead of juicy fillings greatly diluting the taste.

Step 3 – Kneading the Dough


Note: This step is optional. You can find dumpling “wrappers” at your local Asian grocery store.

However, for those ambitious people out there to make the “wrappers,” your gonna wanna take your dough and rip off a large chunk. Next, you’re gonna wanna roll it around in your hands until you have a large strip about the width of an ok sign. Then cut the strip into small cubes and flatten those cubes into disks. Next, take a rolling pin and roll it out into a circle shape. Special Hint: When using the rolling pin only push up to the center then turn the circle and repeat. This will help make the wrapper more round and provide a thicker base for the dumpling.

Step 4 – Making the Dumplings


Folding the dumplings is a crucial but difficult step. I personally suck at this but it makes a great family activity or something fun to do with friends. To do this your gonna wanna take the 饺子皮 and fill it with filling. Then your gonna wrap the dough around it and make periodic folds. Finally, pinch the top to make sure it doesn’t leak during the cooking process. Making dumplings is quite difficult so I’ve included a video on how to do it here. FULL DISCLOSURE I FOUND THIS VIDEO ON YOUTUBE.

Step 5 – Cooking


There are two main ways to cook them, boiling and frying.
Boiling – You’re gonna wanna prepare a pot of boiling water and slowly put the dumplings in. Once they float to the surface they should be ready. But always double-check and make sure the meat is cooked inside.
Frying – Prepare a hot pan and put a little bit of oil on the bottom. Next, put the dumplings in the pan and fill the pan with water up to half the height of the dumplings. Then cover and wait for the water to evaporate. After the water has evaporated cook the dumplings at low temperature for another 2-3 minutes and they will be done. Again always double-check just to be sure.

Step 6 – Eating


ENJOY THE DUMPLINGS!!!
You can add a sauce to give the dumplings an extra flavor. Combine soy sauce, vinegar, sugar, salt, hot water, minced garlic, and some hot peppers.

Images:
1. https://www.enjoyyourcooking.com/wp-content/uploads/2011/05/dumpling-dough-milk-egg-step12-1280×720.jpg
2. https://omnivorescookbook.com/wp-content/uploads/2016/09/1608_Pork-Dumplings_005.jpg
3. https://realfood.tesco.com/media/images/TescoWinter40-DumplingsStep2A-92ad571d-b78f-4f39-a581-c77aee776be2-0-4134×2756.jpg
4. https://redhousespice.com/wp-content/uploads/2019/01/dumpling-wrappers-By-redhousespice.com-video-cover-1.jpg
5. https://redhousespice.com/wp-content/uploads/2019/01/how-to-fold-dumplings-by-redhousespice.com-7.jpg
6. https://i1.sndcdn.com/artworks-ZBwzYizFben0OsXn-ZOUHHA-t500x500.jpg